AI and NLP-Powered Spam Detection for Discord: A MindsDB and HuggingFace Tutorial


Introduction
Spam detection is a critical task in ensuring a healthy online environment for Discord users. Spam messages can disrupt conversations and waste valuable time. Discord is a popular chat platform that enables real-time communication using text, voice, and video.
This guide demonstrates how to construct a spam detection bot for Discord using machine learning techniques. The bot is created using powerful AI libraries, MindsDB, and Hugging Face. MindsDB is a user-friendly open-source machine learning tool that allows the development of predictive models without the need for in-depth knowledge of machine learning. Hugging Face is a widely used natural language processing library that offers access to pre-trained models for various NLP tasks, including spam detection.
Upon completion of this guide, you will have the skills to create a spam detection bot that can identify and flag spam messages in real-time on any Discord server. This bot will enhance the communication experience of Discord users by filtering out unwanted messages and keeping conversations productive.
What is MindsDB?
MindsDB is a user-friendly open-source machine learning tool that enables users to develop and implement predictive models with ease. It simplifies the process of creating machine learning models by providing a straightforward interface that utilizes SQL queries. This approach enables users without an in-depth understanding of machine learning algorithms to build models with ease.
MindsDB is versatile and supports various machine learning tasks, including regression, classification, time-series forecasting, and anomaly detection. It utilizes automated machine learning (AutoML) to automate the model selection, feature engineering, and hyperparameter tuning processes.
MindsDB is a powerful tool that democratizes machine learning and makes it accessible to everyone. It can be used for numerous applications, such as fraud detection and natural language processing, and can aid both individuals and businesses in making data-driven decisions.
Create and Train Language Translation Huggingface Model
We can create a Hugging Face model for language translation using the below command in MindsDBCloud Editor.
So, let's look at the SQL statement now.
CREATE MODEL mindsdb.hf_spam
PREDICT PRED
USING
engine = 'ENGINE_NAME',
task = 'TASK',
model_name = 'TRAINING_MODEL_NAME',
input_column = 'COLUMN',
labels = ['ham', 'spam'];
Before we proceed, let's take a look at all of the parameters we're passing in the USING statement.
engine: This parameter specifies the backend engine that MindsDB should use to run the model. Possible values for this parameter includelightwood,tensorflow,huggingface, andsklearn.task: This parameter specifies the type of machine learning task that the model is being trained for. Possible values for this parameter includeclassification,regression,forecasting, andanomaly_detection.model_name: This parameter specifies the name of the model that was trained using MindsDB's training API.input_column: This parameter specifies the name of the column in the input data that the model will use to make predictions.labels: This parameter specifies the set of possible output labels for the model's predictions. In this case, the model is a binary classifier, so the possible labels arehamandspam. If the model were a multi-class classifier, thelabelsparameter would contain all possible classes.
The actual query will become like this after replacing the placeholders with appropriate values.
CREATE MODEL mindsdb.hf_spam
PREDICT PRED
USING
engine = 'huggingface',
task = 'text-classification',
model_name = 'mariagrandury/roberta-base-finetuned-sms-spam-detection',
input_column = 'text',
labels = ['ham', 'spam'];
This should return the row record of the newly created model from the models table upon successful execution.

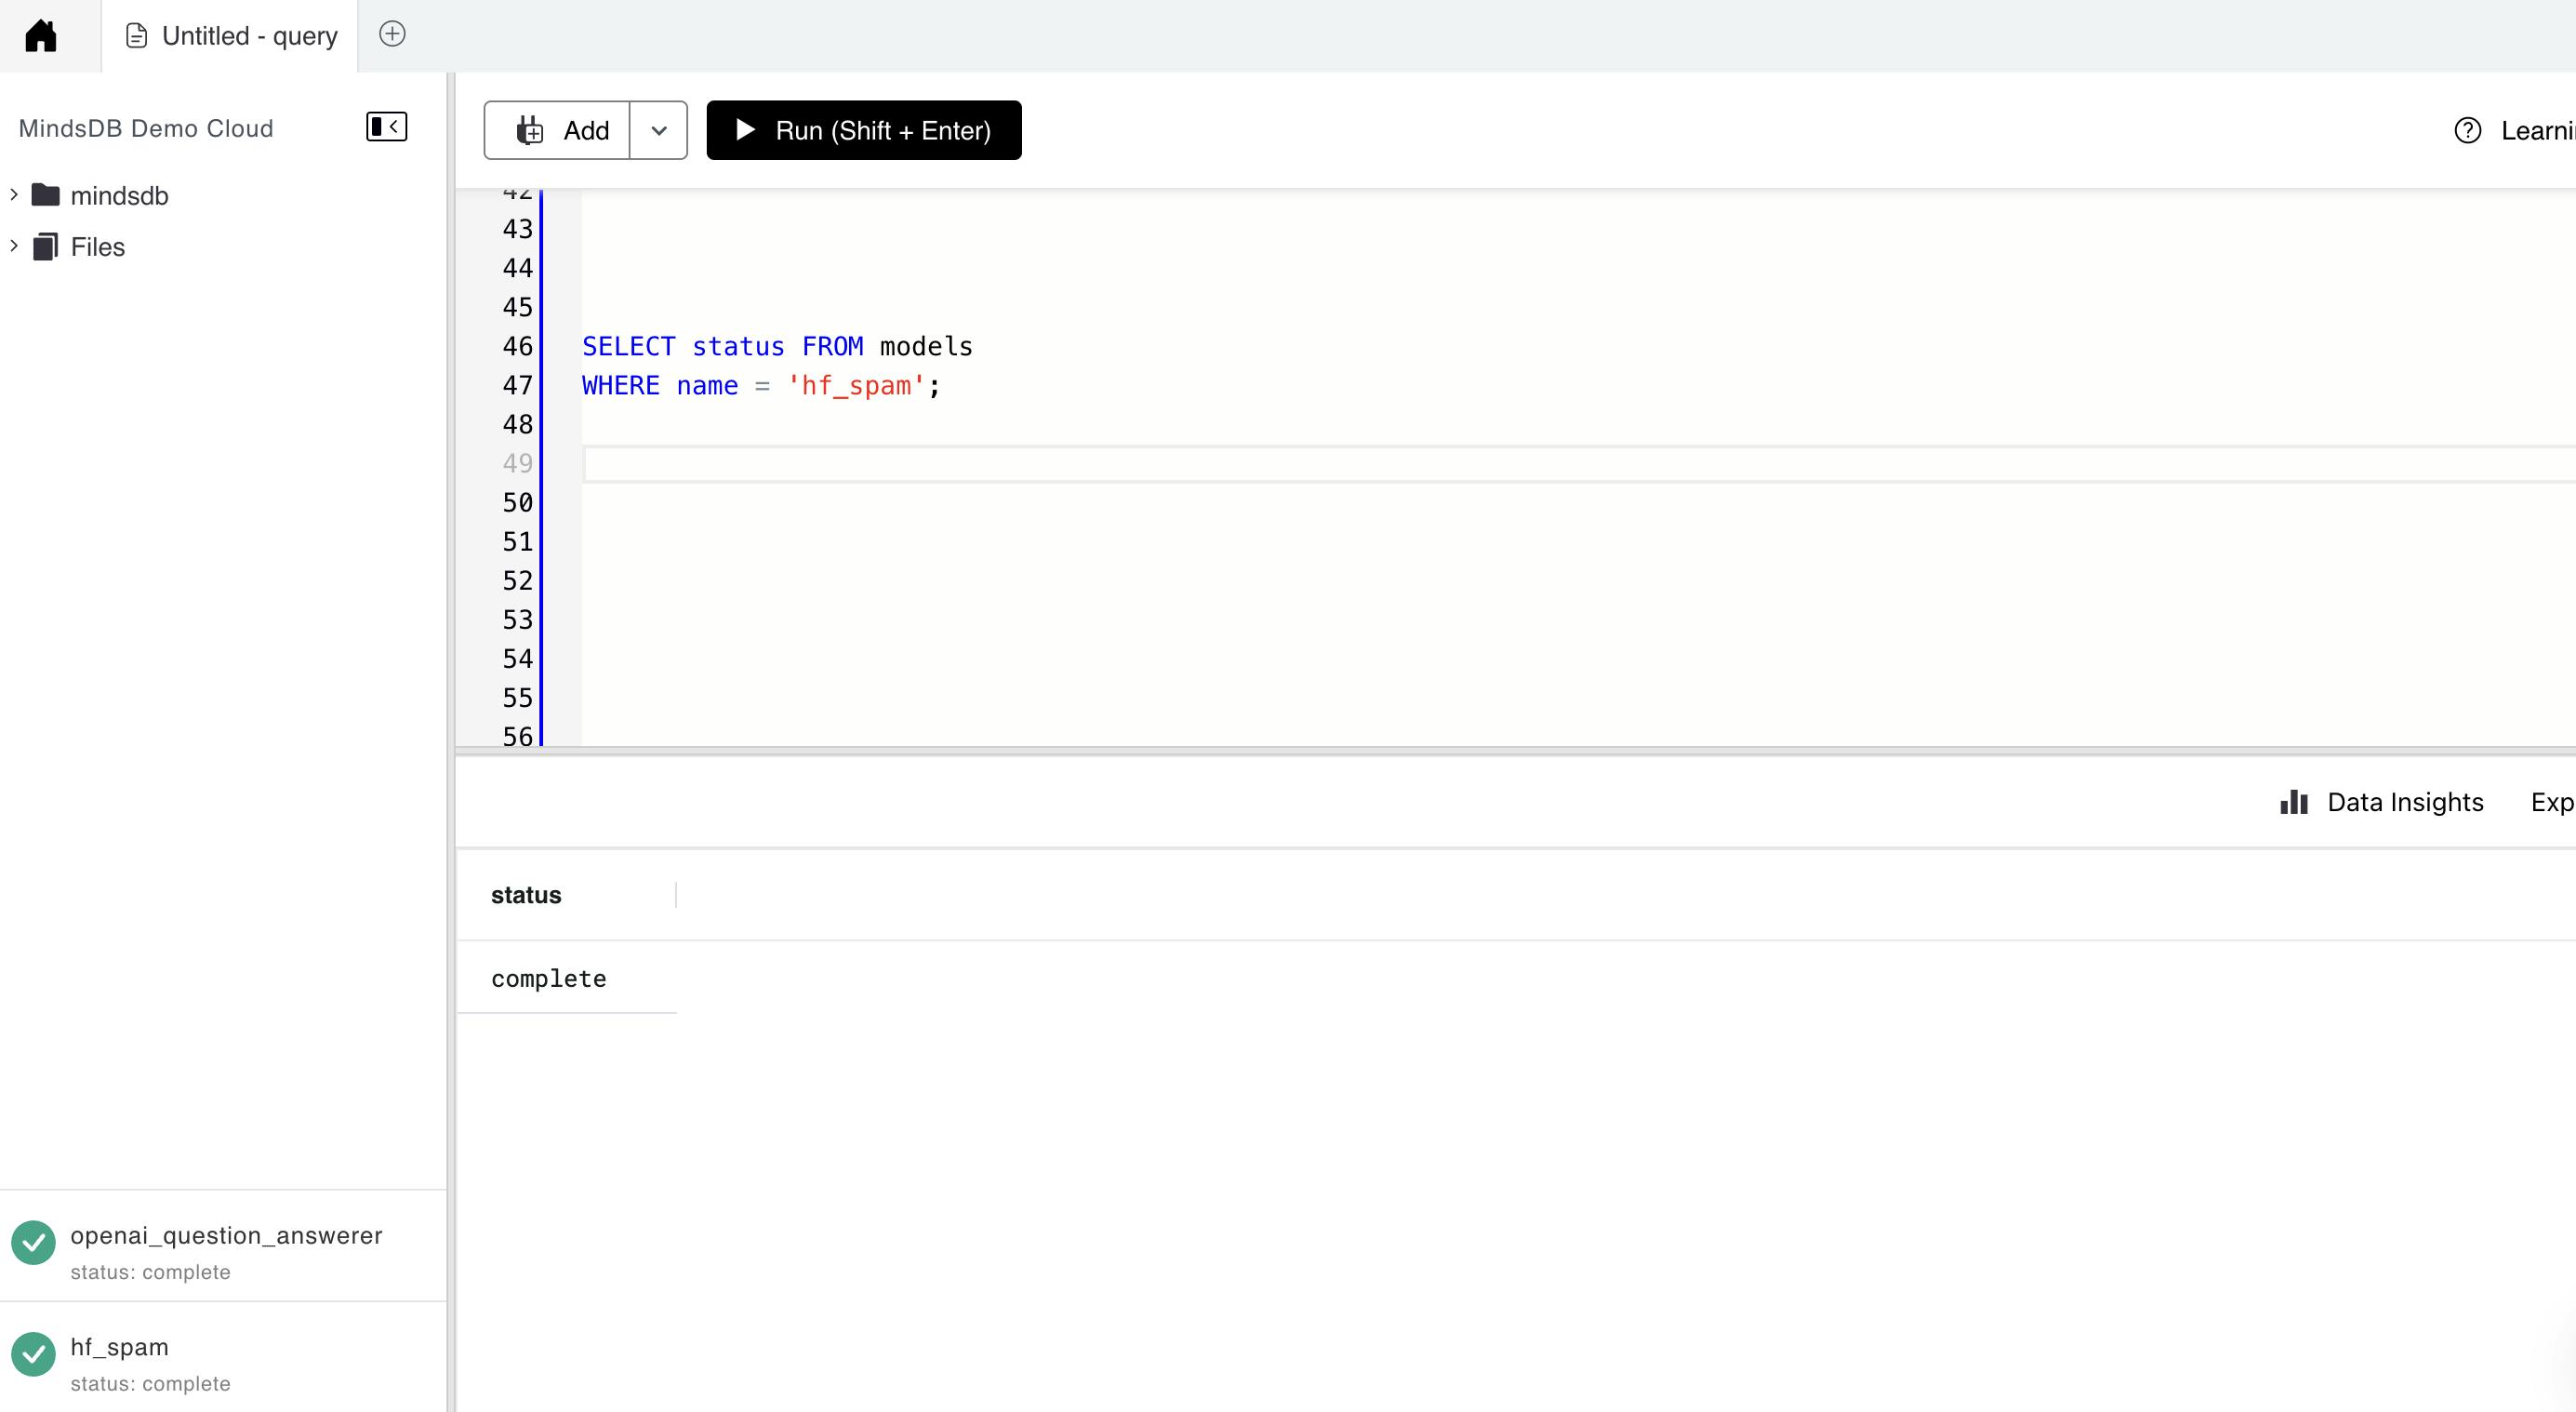
Status of the Model
The model might take a while to be ready for use. In the meantime, we can check its status with the query below.
SELECT status FROM models
WHERE name = 'hf_spam';
Create Discord Bot using Node.js
Setup Discord Application
Open the Discord app and create a new Discord server.
Create a new application on the Discord Developer Portal (discord.com/developers/applications).

Give the application a name and click "Create".

Click on the "Bot" section and then click "Add Bot" and give the bot a username and click "Save Changes".

Click on the "OAuth2" section and select the "bot" checkbox under "Scopes" and select the permissions the bot should have under "Bot Permissions".

Copy the generated URL and paste it into a new browser window.

Select the server where the bot should be added and click "Authorize"

Application Setup
Run the command "npm init" to create a new Node.js project.
Install all the necessary library by running the below command
npm install discord.js
npm install express
npm install dotenv
npm install mindsdb-js-sdk
        {
          "name": "discordbot",
          "version": "1.0.0",
          "description": "This is Discord bot which Interact with you.",
          "main": "index.js",
          "scripts": {
            "start": "node index.js",
            "test": "echo \"Error: no test specified\" && exit 1"
          },
          "author": "Arman Chand",
          "license": "ISC",
          "dependencies": {
            "body-parser": "^1.20.2",
            "discord.js": "^14.9.0",
            "dotenv": "^16.0.3",
            "express": "^4.18.2",
            "mindsdb-js-sdk": "^2.2.0"
          }
        }
Create a new JavaScript file in the folder and name it "index.js" and paste the following code:
 require('dotenv').config();
 const express = require('express');
 const app = express();
 const Discord = require('discord.js');
 const bodyParser = require("body-parser");

 const { connectToMindsDBCloud,analyzeSpamDetection } = require("./dispatcher/mindsdb.js")
 const client = new Discord.Client({ intents: [
   Discord.GatewayIntentBits.Guilds,
   Discord.GatewayIntentBits.GuildMessages,
   Discord.GatewayIntentBits.MessageContent
 ]})
 app.use(bodyParser.urlencoded({ extended: true }));
 app.use(bodyParser.json());
 app.get('/', (req, res) => {
   res.send('Discord bot is running!');
 });
 client.on('ready', () => {
   console.log(`Logged in as ${client.user.tag}!`);
 });

 client.on('messageCreate', async (message) => {
   if (message.author.bot) return;
   if (message.content.startsWith('!spam')) {
     const query = message.content.slice(5).trim();
     await connectToMindsDBCloud();
     const response = await analyzeSpamDetection(query);
     console.log("result----->",response);
     message.reply(JSON.stringify(response.rows[0]));
   }
 });
 client.login(process.env.TOKEN);
 const PORT = process.env.PORT || 3000;
 app.listen(PORT, () => {
   console.log(`Express app is listening on port ${PORT}!`);
 });
Maintain a separate .env file to store the secret key and password.
Create a new file (mindsdb.js) where we maintain code for Maintaining connection with MindsDB Cloud and Function to interact to fetch the result of the trained Model to Predict the Queries.
 async function connectToMindsDBCloud() {
   try {
     await MindsDBCloud.connect({
       user: process.env.MINDSDB_USER,
       password: process.env.MINDSDB_PASS,
     });
     console.log("Suceesfully connected to MindsDB Cloud");
   } catch (error) {
     console.log("Problem connecting to MindsDB Cloud:", error);
     throw error;
   }
 }
Create an async function that attempts to run a SQL query using the
MindsDBCloud.SQL.runQuerymethod. The method takes in a query string that selects data from a specified table (spamModel) where thetextcolumn matches themessageparameter. The results of the query are stored in a variable calledspamResponse.async function analyzeSpamDetection(message) { let retries = 3; // Maximum number of retries while (retries > 0) { try { const text = `SELECT * FROM ${spamModel} WHERE text="${message}" `; console.log("test---->",text) const spamResponse = await MindsDBCloud.SQL.runQuery(text); console.log("response--->",spamResponse) if (!spamResponse.rows) { throw new Error("Invalid response from MindsDB"); } return spamResponse; } catch (error) { console.log("Error detecting spam:", error); retries--; if (retries === 0) { throw new Error("Maximum number of retries reached"); } await new Promise((resolve) => setTimeout(resolve, 1000)); // Wait for 1 second before retrying } } }Save the file and run the command "npm start" in the terminal to start the discord bot.
Open Discord and send a message containing "!spam " and then pass the word which you want to verify whether it's a spam or ham message, to the server where the bot is located.

Congratulations, you have created a basic Discord bot using Node.js! From here, you can continue to add features and functionality to your bot to make it more useful and interactive.
Deployment using Railway.app
Create a new project in railway.app: First, create a new project in railway.app by logging in to your account and clicking on "New Project." Choose a name and select the "Node.js" template.
Connect your Github or Gitlab repository: If your Discord bot code is already hosted on Github or Gitlab, you can connect your repository to railway.app by clicking on the "Connect Repository" button in your project dashboard. Otherwise, you can upload your code directly to railway.app

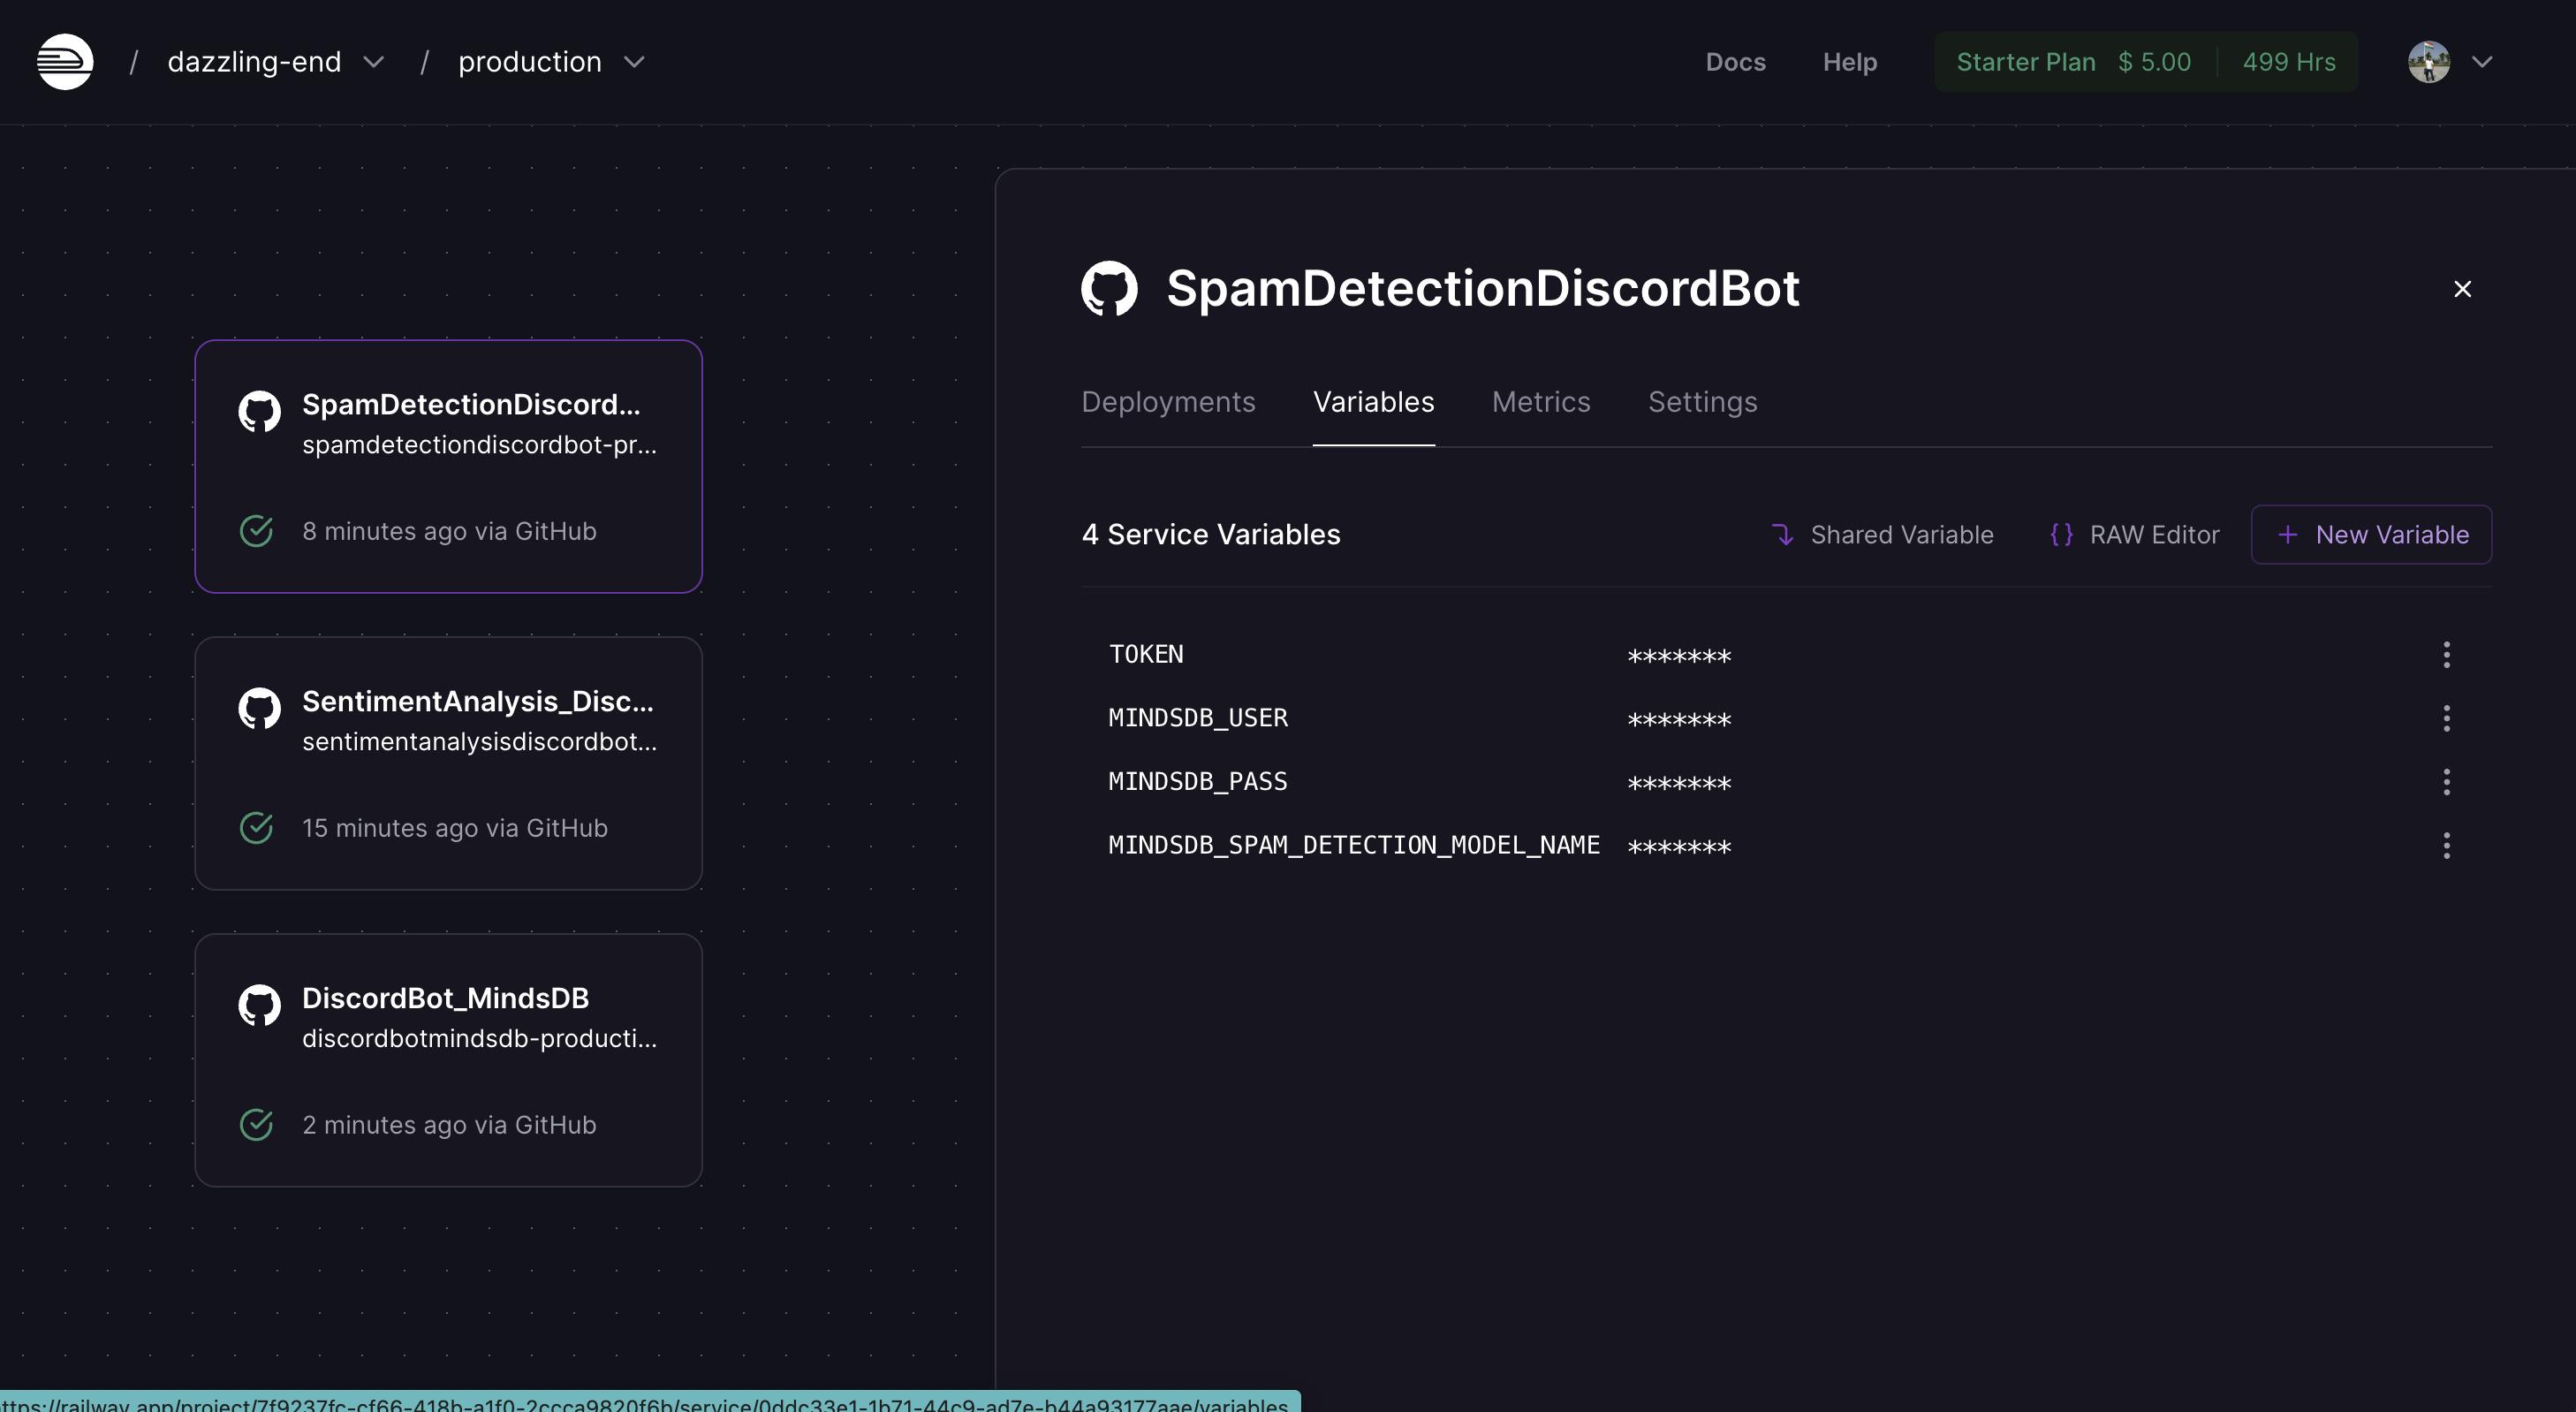
Set up environment variables: Set up environment variables for your Discord bot, such as the Discord bot token and any API keys or credentials required for your bot's functionality. You can do this by clicking on the "Environment Variables" tab in your project dashboard and adding the necessary variables
Install dependencies: Install the necessary dependencies for your Discord bot by running "npm install" in the terminal or command prompt.
Start your bot: Start your Discord bot by running the command "node index.js" in the terminal or command prompt. Make sure your bot is functioning as expected by testing its functionality.

Configure a Discord webhook: In order to keep your bot running on railway.app, you'll need to configure a Discord webhook to ping your bot periodically. You can do this by adding a new "Scheduled Task" in your railway.app project dashboard and specifying the URL for your webhook.
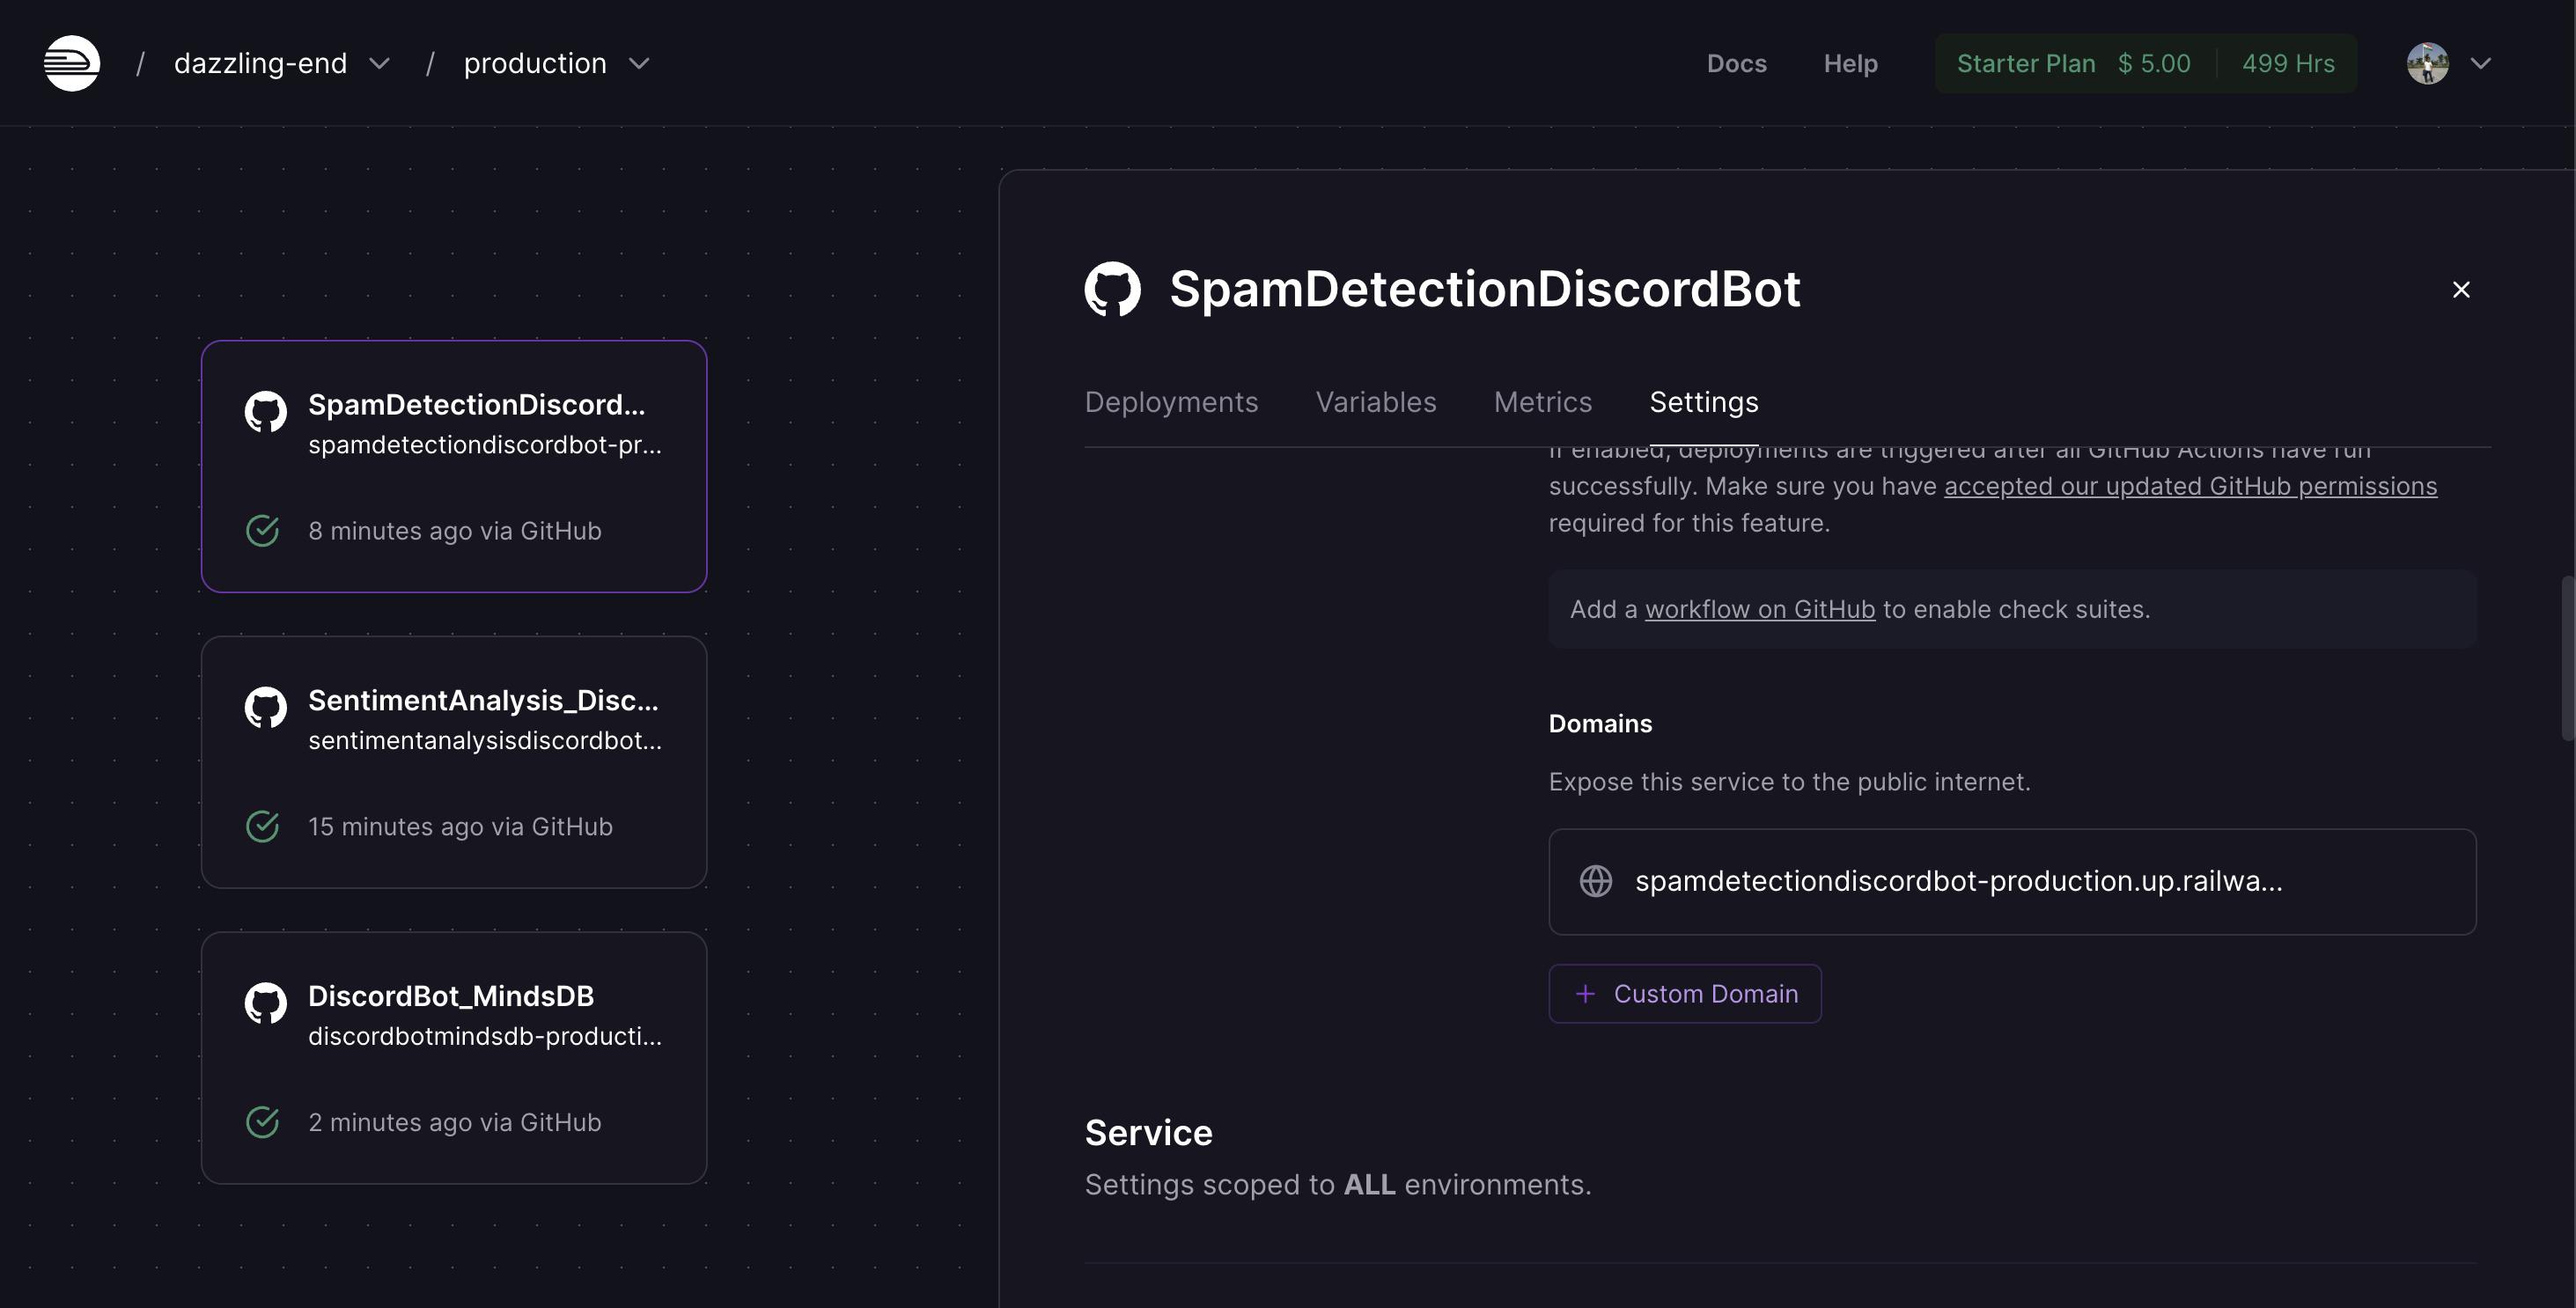
Expose your application: Go to the setting tab and check the Domain section, Click on Generate url . Now your application is exposed on the internet.
URL: spamdetectiondiscordbot-production.up.railway.app
That's it! Your Discord bot should now be up and running on railway.app.
Conclusion
In conclusion, you have successfully created a web application using Express.js that integrates with MindsDB's machine learning model for spam detection and Hugging Face's Transformers library for natural language processing. This means that users can now use the application to classify messages as spam or not spam with high accuracy.
The process likely involved setting up an Express.js application, installing and configuring the necessary libraries for MindsDB and Hugging Face, training the model on a dataset of spam and non-spam messages, integrating the model into the application, and setting up appropriate routes for users to interact with the application.
Overall, this project demonstrates how machine learning models can be used to automate tasks like spam detection in web applications, improving the user experience and reducing the workload for moderators. The combination of MindsDB and Hugging Face's Transformers library makes it easy to build powerful and accurate machine-learning models for natural language processing tasks like spam detection.
MindsDB has recently organized a Hackathon in collaboration with Hashnode. You can check all the details by clicking on the banner below.